Heroku for Highly Available Dropwizard Apps
Table of Contents
Introduction
This post documents how we are using Heroku for HA Dropwizard based java applications at my workplace.
It is worth noting, that while I have used Heroku in side projects and hacks, this is my first experience of using it for a business critical app.
Motivation
The primary motivation behind trying out Heroku is to reduce the the time required to bootstrap a new HA microservice, where bootstrap includes tasks like:
- Setup of environments like CI, Test and Prod and provisioning machines
- Setup of infrastructure components like load balancers
- Setup of release automation, continuous delivery tools and pipeline
- …etc
Additionally, we are hoping Heroku will reduce the ongoing maintenance effort spent by the engineering time as we can exploit some benefits of a PaaS and worry less about infrastructure compared to a IaaS based setup.
Usage Pattern
We looked at available options for various aspects like build and release, routing, global traffic management etc and the following sections highlight what we have settled with for the time being.
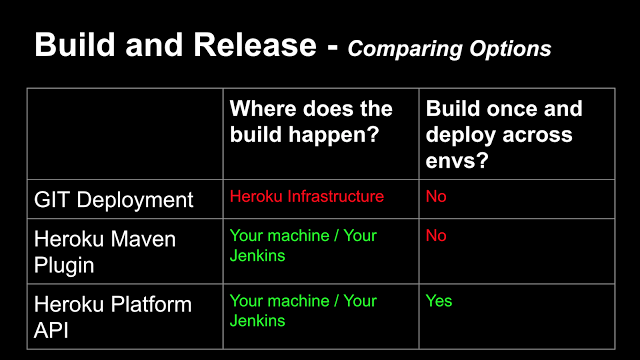
Build and Release
The default Git deployment feature has limitations which make it unsuitable for use, given our use-case. The build happens on the heroku infrastructure which means we can’t reference dependencies in our private nexus server which isn’t accessible outside our private enterprise network.
The build is repeated with each deployment as we propagate changes across environments (we prefer building once and then deploying the built artifact to environments).
In light of the above limitations, we use the Heroku maven plugin instead, which allows builds to happen inside our private infrastructure and pre-built artifacts to be deployed to Heroku.
In summary, this can be achieved by including the following in the application’s pom.xml
<build>
   <plugins>
       <plugin>
           <groupId>com.heroku.sdk</groupId>
           <artifactId>heroku-maven-plugin</artifactId>
           <configuration>
               <appName>${APP_NAME}-${REGION}-${ENV}</appName>
           </configuration>
       </plugin>
       …
  </plugins>
  …
</build>
With the maven plugin setup, we simply deploy the app to heroku using standard maven commands like:
mvn clean heroku:deploy -DAPP_NAME={appName} -DREGION={region} -DENV={env}
An API key to automate deployment via Jenkins may be used. This enables invoking heroku API (which is what the maven plugin uses) without manual authentication with a username and password each time. To use an API key we simply pass the following system property to the maven command.
-DherokuApiKey={}
At the moment, we rebuild from a tag each time we have to deploy to an environment. We understand this is not optimal and will replace this with a mechanism of copying a pre-built artifact (slug in Heroku terminology) straight to an app (in an env) using the Heroku platform API.
Our findings and thoughts are summarised in the slide below:
## Application Config
Prior to using Heroku, we used Puppet for config management and automating our releases. Puppet provides a tool called Hiera for lookup and management of environment specific application configuration data.
Given, we can’t (and don’t want to) use Puppet and hiera, we use a simple equivalent of hiera as a sub-directory in our code base that holds config tokens for each environment. These config values are used to replace tokens in config values at build time using maven resource filtering option.

<filters>
   <filter>env-config/${ENV}.properties</filter>
</filters>
<resources>
   <resource>
       <directory>src/main/resources</directory>
       <filtering>true</filtering>
       <includes>
           <include>**/*.yml</include>
       </includes>
   </resource>
</resources>
This has a limitation that the build has to be repeated for each environment so that the correct environment specific token values are used.
In the longer run, we plan to implement or reuse an existing tool, along the lines of next-build-tools that picks env config values from a separate config repo and makes them available to the Heroku app via it’s config variables feature. This will enable separating the env config setup from the app build and we won’t have to repeat builds of the same app version for each environment.
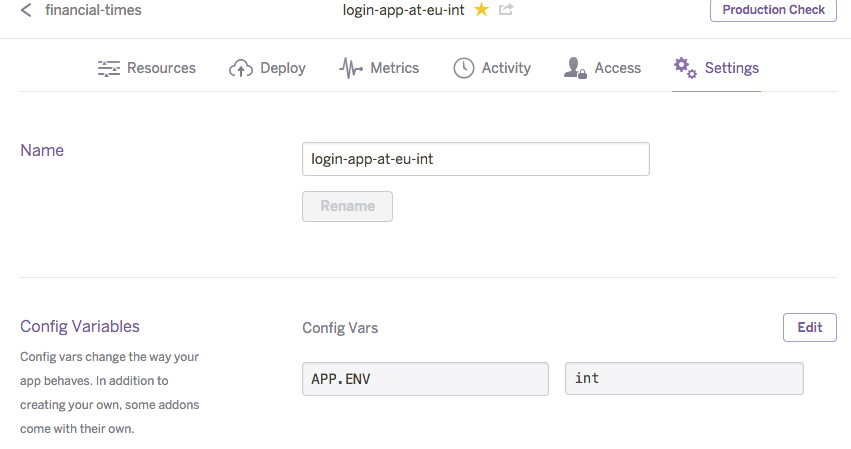
The config is then available to the code as standard System variables.
Example: System.getenv('key')
Secure Config
Secure config is not stored in the source code repo and deployed manually to the heroku app. Again, just like the generic app config described in the previous section, we plan to implement a tool that deploys secure config from a secure location - secret git repo / last pass / secure server location directly to the config variables section of the Heroku app.
Global Traffic Management
For High Availability and fault tolerance we like are apps to be available in more than one region primarily for resilience and less importantly for performance and latency reasons. We like geo-routing client requests to the nearest Heroku app.
Traditionally, we have used Dyn for multi-region geo-routing and automated failover. However, with Heroku Dyn doesn’t work due to limitations in the Heroku platform itself.
For 2 Heroku apps (one in each region - US and EU), to respond to the same custom DNS name (say, myapp.mydomain.com), one of the following configurations are required.
- Host Header with name of the Heroku app before the request is forwarded to the Heroku platform Dyn is a DNS solution and cannot be used to effectively override the Host headers while checking the health of more than one origins (required for automated failover when a region is unavailable). So when the request reaches the Heroku platform, the Host is still myapp.ft.com and there is no way for Heroku to know which app to forward the request to.
- Custom domain config in the Heroku app settings
This option also does not do the trick as the same custom domain name cannot be used across more than one Heroku app.

We achieve, multi-region geo-routing and failover using a CDN like Akamai or Fastly. With Akamai, we configure an overridden host header before forwarding a request to the origin Heroku app. Thus, when the request reaches the Heroku platform, it can reliably determine the Heroku app name via the Host header.
The pseudo code below describes at a high level what our CDN configuration looks like to achieve Global Traffic Management that routes traffic based on the geo-ip of the client and also performs automated failover incase a region is unavailable.
if ( request from US ) {

	route to US origin (-H Host:myapp-us.herokuapp.com)
	if (response.status == 5xx)
		route to EU origin

} else if ( request !from US ) {

	route to EU origin (-H Host:myapp-eu.herokuapp.com)
	if (response.status == 5xx)
		route to US origin
}
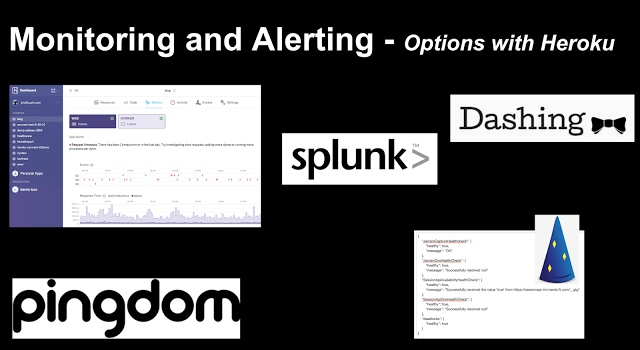
Monitoring and Alerting
We use the following tools for monitoring our apps in Heroku:
- Out of the box Heroku app metrics reporting
- Splunk
- Dropwizard app health-checks
- HTTP health/availability check for downstream dependencies
- DNS check for downstream dependencies
- Pingdom
- Monitors the dropwizard healthchecks and alerts when something is wrong
- Dashing
- Exposes dashboards that show the state dropwizard healthchecks
- Acceptance Tests as Monitors - atam4j
- We use a separate dropwizard app that runs acceptance tests on a schedule and reports the results under the healthcheck resource
- The healthcheck are polled to detect problems
Lightning Talk Slide Deck
Recently did a lightning talk on this topic and below is the slide deck used for reference